


The M60F is a compact time-of-flight distance sensor designed for small robots where space is limited but reliable distance sensing is still important. It can work as a simple digital detector, a PWM distance sensor, or a configurable serial sensor, making it suitable for everything from Mini Sumo robots to custom automation projects.
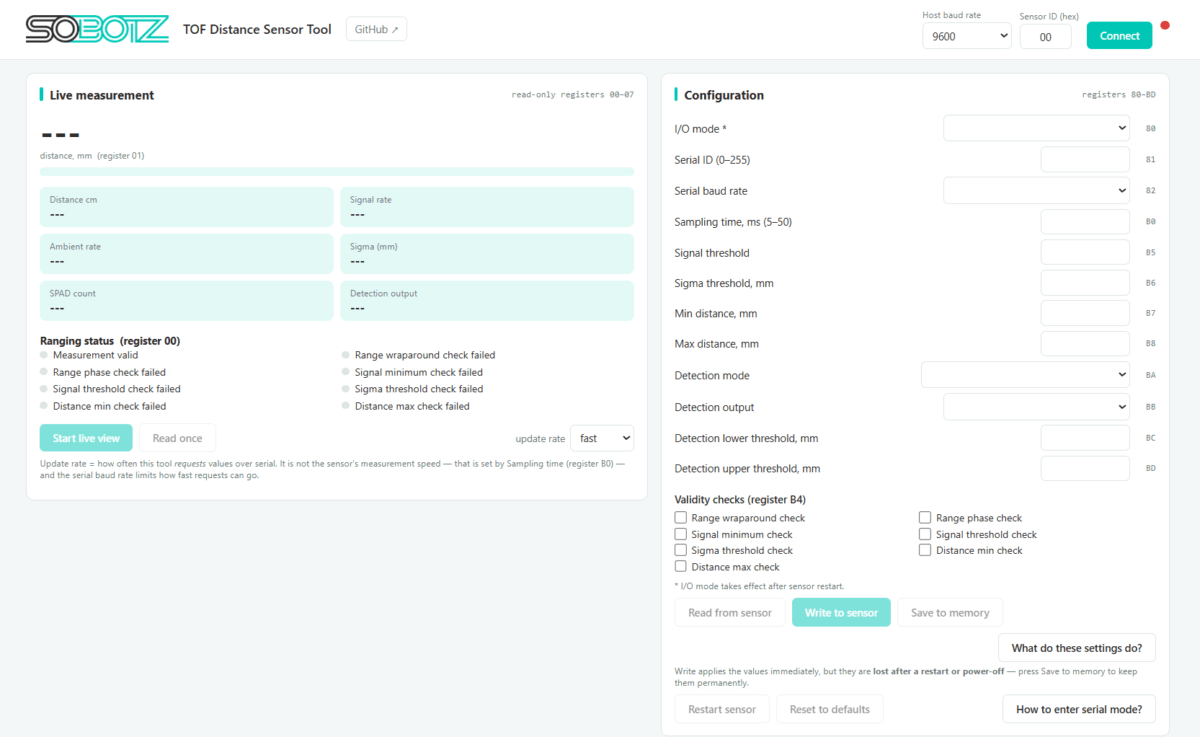
To make setup easier, we’ve built a browser-based configuration tool that lets you read live measurements and change the sensor’s settings without writing any code.
Configuration tool:
https://sobotz.com/M60F_Sensor_Tool.html
Connecting the sensor
The M60F uses a half-duplex UART interface, so the TX and RX pins of your USB-UART adapter need to be connected together and wired to the sensor’s SIG pin. A 2.4k–10k pull-up resistor from SIG to the supply voltage is also required.
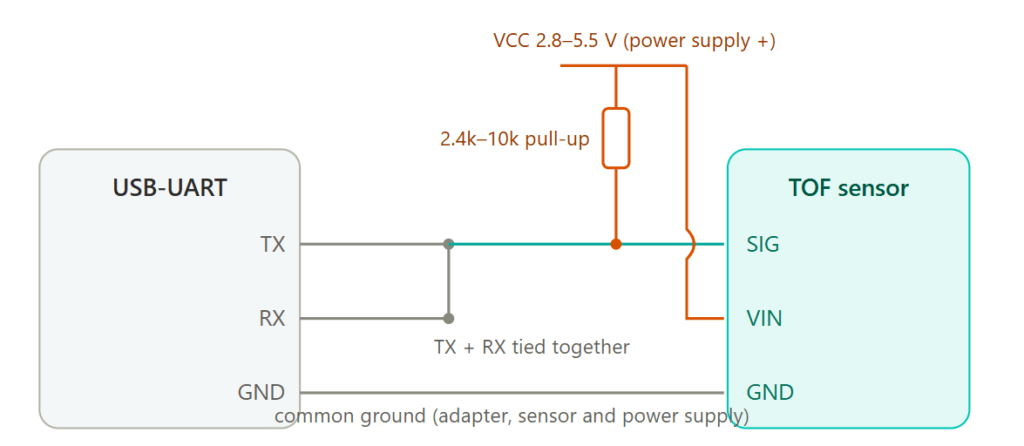
Power the sensor from 2.8–5.5 V and make sure the adapter and sensor share the same ground.
Entering serial mode
If the sensor is currently running in Digital or PWM mode, it needs to be started in serial mode before it can be configured.
- Disconnect power.
- Short SIG to GND.
- Reconnect power.
- Wait at least 50 ms.
- Remove the short.
The sensor will now communicate at 9600 baud with ID 00. This is only temporary—the sensor returns to its saved mode after the next restart.
Configuring the M60F
Once connected, the tool allows you to:
- View live distance measurements
- Change the output mode (Serial, Digital or PWM)
- Set the sensor ID and baud rate
- Adjust minimum and maximum sensing distance
- Configure signal and noise thresholds
- Save settings permanently to the sensor
For most robotics projects, the only settings you’ll need are the output mode and the sensing range.
Saving your settings
There are two different write options in the tool:
- Write to Sensor applies the settings immediately but they’re lost after power cycling.
- Save to Memory stores the configuration permanently.
If you’ve finished tuning the sensor, always remember to save it to memory before disconnecting.
Digital and PWM modes
The M60F doesn’t always need a UART connection.
In Digital mode, the SIG pin simply outputs HIGH or LOW depending on your configured detection distance.
In PWM mode, the sensor outputs a standard 20 ms PWM signal where the pulse width represents the measured distance. This makes it easy to connect directly to many microcontrollers without using serial communication. Do note, that with Arduino based microcontrollers it’s harder to achieve, because to make non-blocking PWM reading requires interrupts, which a standard atmega328p only has two, and both are tied to pins.
Troubleshooting
If the sensor isn’t responding:
- Make sure it was started in serial mode.
- Check that TX and RX are tied together.
- Verify the pull-up resistor is installed.
- Confirm all grounds are connected.
If communication is unreliable, adding a 1k–2.2k resistor in the USB-UART TX line often helps with half-duplex communication.
Also, we didn’t have luck using a Arduino Nano as the UART converter, so we suggest connecting the sensor directly to a UART converter, not an Arduino Nano with reset tied to ground.
The M60F was designed to be simple to integrate while still offering the flexibility needed for competitive robotics. Whether you’re building a Mini Sumo robot or experimenting with autonomous projects, the configuration tool makes setup quick and straightforward.
Try it here: https://sobotz.com/M60F_Sensor_Tool.html
