


„M60F“ yra kompaktiškas skrydžio laiko atstumo jutiklis, skirtas mažiems robotams, kuriuose erdvė ribota, tačiau patikimas atstumo matavimas vis tiek svarbus. Jis gali veikti kaip paprastas skaitmeninis detektorius, PWM atstumo jutiklis arba konfigūruojamas nuoseklusis jutiklis, todėl tinka viskam – nuo „Mini Sumo“ robotų iki individualių automatizavimo projektų.
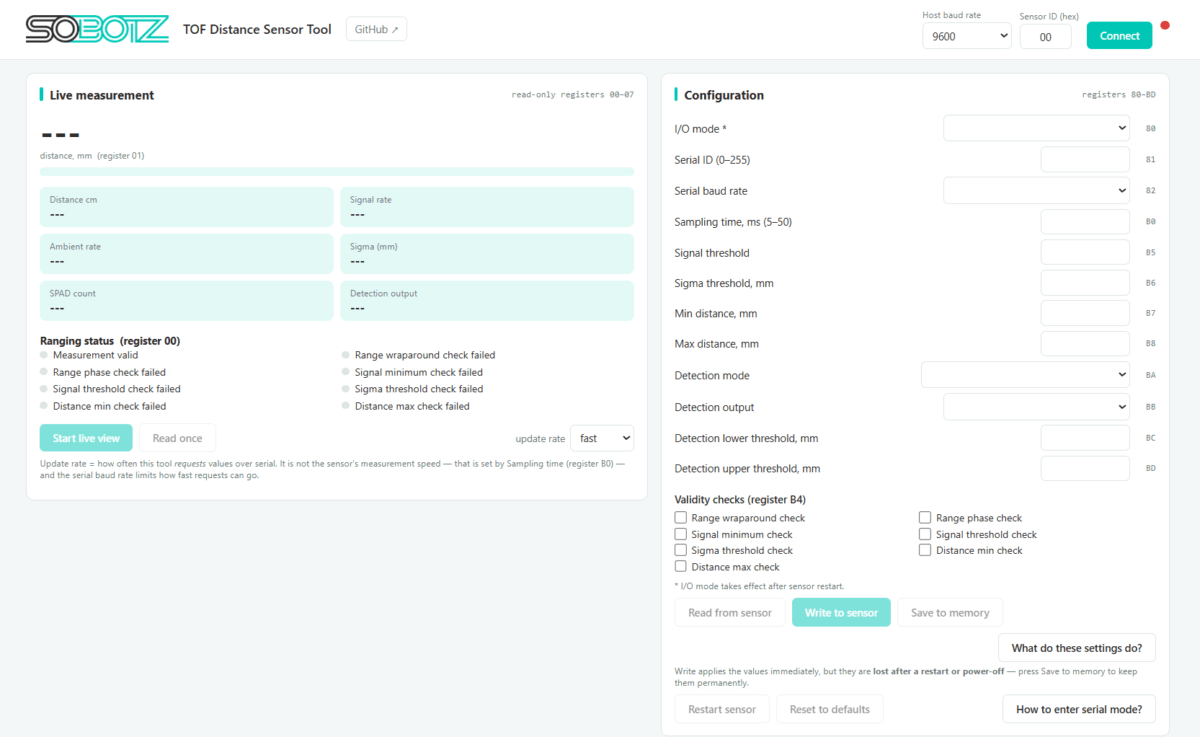
Kad sąranka būtų paprastesnė, sukūrėme naršyklėje veikiančią konfigūravimo priemonę, leidžiančią nuskaityti tiesioginius matavimus ir keisti jutiklio nustatymus nerašant jokio kodo.
Konfigūravimo įrankis:
https://sobotz.com/M60F_Sensor_Tool.html
Jutiklio prijungimas
M60F naudoja pusiau dvipusę UART sąsają, todėl jūsų USB-UART adapterio TX ir RX kontaktus reikia sujungti ir prijungti prie jutiklio. SIG kaištis. 2,4k–10k įtempimo rezistorius iš SIG Taip pat reikalinga maitinimo įtampa.
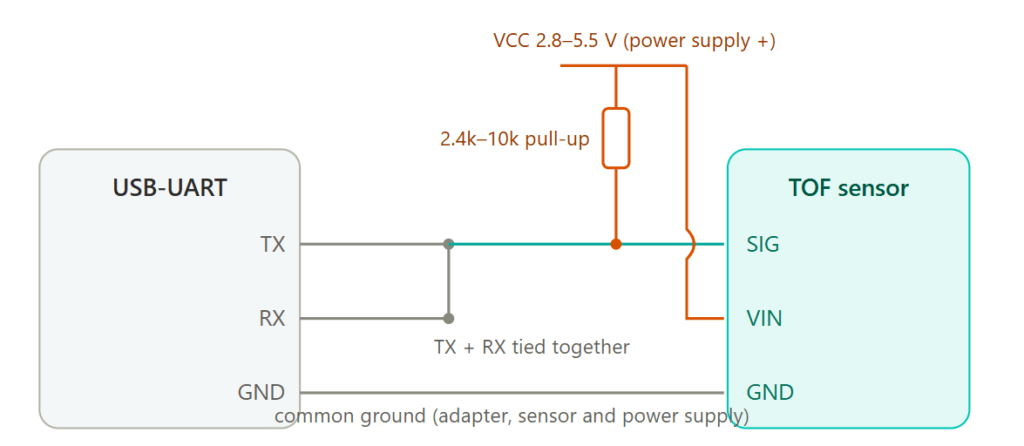
Maitinkite jutiklį iš 2,8–5,5 V ir įsitikinkite, kad adapteris ir jutiklis turi tą patį įžeminimą.
Įjungiamas nuoseklusis režimas
Jei jutiklis šiuo metu veikia skaitmeniniu arba PWM režimu, prieš konfigūruojant jį reikia paleisti nuosekliuoju režimu.
- Atjunkite maitinimą.
- Trumpas SIG į Įžeminimas.
- Prijunkite maitinimą.
- Palaukite bent 50 ms.
- Nuimkite trumpąjį jungtį.
Jutiklis dabar bendraus adresu 9600 baudų su ID 00. Tai tik laikina – jutiklis grįžta į išsaugotą režimą po kito paleidimo iš naujo.
M60F konfigūravimas
Prijungus įrankį, galite:
- Peržiūrėti tiesioginius atstumo matavimus
- Pakeiskite išvesties režimą (nuoseklusis, skaitmeninis arba PWM)
- Nustatykite jutiklio ID ir duomenų perdavimo spartą
- Minimalaus ir maksimalaus jutimo atstumo reguliavimas
- Signalo ir triukšmo slenksčių konfigūravimas
- Išsaugoti nustatymus visam laikui jutiklyje
Daugumai robotikos projektų vieninteliai reikalingi nustatymai yra išvesties režimas ir jutimo diapazonas.
Išsaugomi jūsų nustatymai
Įrankyje yra dvi skirtingos rašymo parinktys:
- Rašyti į jutiklį Nustatymai pritaikomi iš karto, bet po maitinimo ciklavimo jie prarandami.
- Įrašyti į atmintį konfigūraciją saugo visam laikui.
Jei baigėte jutiklio derinimą, prieš atjungdami visada nepamirškite išsaugoti jo atmintyje.
Skaitmeninis ir PWM režimai
M60F ne visada reikia UART jungties.
Į Skaitmeninis režimas, SIG kaištis tiesiog išveda HIGH arba LOW signalą, priklausomai nuo jūsų sukonfigūruoto aptikimo atstumo.
Į PWM režimas, jutiklis išveda standartinį 20 ms PWM signalą, kuriame impulso plotis atitinka išmatuotą atstumą. Tai leidžia lengvai prijungti tiesiogiai prie daugelio mikrovaldiklių, nenaudojant nuosekliojo ryšio. Atkreipkite dėmesį, kad su Arduino pagrindu sukurtais mikrovaldikliais tai pasiekti sunkiau, nes norint atlikti neblokuojantį PWM rodmenį, reikia pertraukimų, kurių standartinis atmega328p turi tik du ir abu yra prijungti prie kontaktų.
Trikčių šalinimas
Jei jutiklis nereaguoja:
- Įsitikinkite, kad jis buvo paleistas serijiniu režimu.
- Patikrinkite, ar TX ir RX yra sujungti.
- Patikrinkite, ar sumontuotas įtempimo rezistorius.
- Įsitikinkite, kad visi įžeminimai yra prijungti.
Jei ryšys nepatikimas, pridedant 1k–2.2k rezistorius USB-UART TX linijoje dažnai padeda palaikyti pusdupleksinį ryšį.
Be to, mums nepavyko naudoti „Arduino Nano“ kaip UART keitiklio, todėl siūlome jutiklį prijungti tiesiai prie UART keitiklio, o ne prie „Arduino Nano“ su atstatymu, prijungtu prie žemės.
„M60F“ buvo sukurtas taip, kad būtų lengvai integruojamas, tačiau tuo pačiu metu užtikrinant konkurencingai robotikai reikalingą lankstumą. Nesvarbu, ar konstruojate „Mini Sumo“ robotą, ar eksperimentuojate su autonominiais projektais, konfigūravimo įrankis leidžia greitai ir paprastai atlikti sąranką.
Išbandykite čia: https://sobotz.com/M60F_Sensor_Tool.html
